Appliance control
Introduction
The Control Set has a built-in power relay (230 V / 16 A), so you can use it to switch household appliances such as a lamp, a fan or even a water pump. It can also drive a digital LED strip.
In this project, we'll use the relay to control a desk lamp and show the room temperature on a programmable LED strip. It's a great start for smart lighting at home, in the office or even on a Christmas tree.
The set contains 3 modules, a power adapter, a 3D-printed enclosure, rubber bands to hold everything in place and an LED strip with 72 pixels.
The Radio Dongle, which you need to create the network, is not included in the set.
Before you start, check that you have everything the project needs.
Assemble the set
- Attach the red Core Module to the yellow Power Module. One pin is missing and one hole in the connector is blocked, so the modules only fit one way round. Take care not to bend the pins as you put them together. If you do bend one, you can easily straighten it again.
- Put the black Cover Module on top of the red Core Module.
- Place the whole assembly in the 3D-printed enclosure and secure it with the rubber bands.
- Plug the included LED strip into the Power Module connector at the bottom of the enclosure.
- Have the power adapter ready, but don't plug it in yet.
Start your own radio network
If you already have a Radio Dongle from another set, you can skip this step.
- Open HARDWARIO Playground on your computer. If you don't have it yet, install it by following this guide.
- In Playground, open the Devices tab.
- Plug the USB Radio Dongle into your computer. It appears at the top, in the Radio Dongle dropdown.
- Click Connect and the radio network starts automatically.
Connect the Control Set
- If you only have the Control Set and you see a Push Button device in the device list in Playground, you can delete it. If you want to use other sets as well, don't delete anything.
- In Playground, click the Start pairing button.
- Take the Control Set connector and plug it into the enclosure. Then plug the power adapter into a socket.
- Once pairing succeeds, a device called Power Control should appear in the list.
Test the communication
Besides button presses, the device also sends temperature and orientation data. See for yourself which messages it sends:
- Open the Messages tab in Playground.
- You'll see a list of the messages your button has sent to your computer through the Radio Dongle.
- Press the button a few times and watch the press count go up.
- Breathe warm air on the device: the temperature rises and shows up among the messages.
- The last type of message is the orientation of the device. It works like rolling a die: turn the device around and find out when positions 1, 2, 3…6 appear.
Your first project
Many tutorials start with "Hello World!" We'll do something more exciting: we'll show the temperature on a gauge!
- In Playground, open the Functions tab.
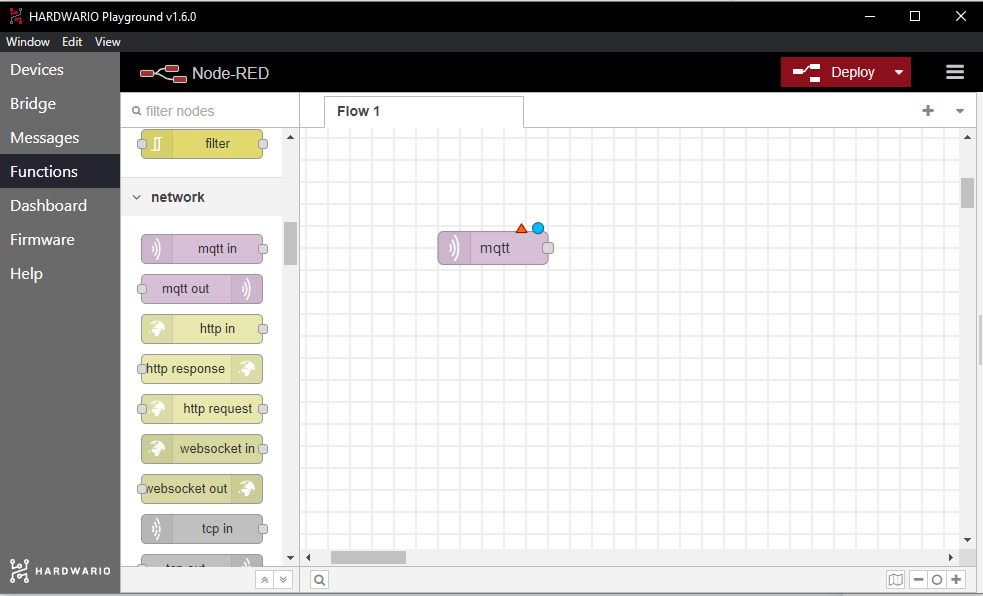
- This is the built-in Node-RED app. It has great documentation, support and a large community of users. It works by visual programming: you drag blocks called nodes onto the workspace and connect them to build a working application (a flow).
- Delete the two default nodes from the workspace.
- Start with an mqtt in node from the network section on the left. Drag it onto the workspace and double-click it.
- A settings window opens. Fill in the Topic field, which decides which messages this flow receives.
- Go back to the Messages tab in Playground and find a temperature message. Next to the temperature value you'll see the message identifier, for example
node/push-button:0/thermometer/0:1/temperature. That's the topic. - Copy the topic, return to the Functions tab, paste it into the Topic field and click Done.
- Now add a gauge node from the dashboard section.
- Double-click it to open its settings. Under Range, change the max value to 50 and click Done.
- Connect the two nodes: grab the small grey square of one node with the mouse and drag it to the other node.
- Click Deploy in the top right corner to start the application. Then switch to the Dashboard tab in Playground.
- Breathe on the device so that it sends a temperature message straight away. The gauge shows the current temperature.
Tip for your next experiment: Try showing the orientation of the device and the number of button presses on the dashboard too. Playground's possibilities are endless!