I'm OK button
Introduction
Do your parents call you every day to check whether you're home from school yet? It's annoying, but they just worry about you. Build a button that sends them a simple message to their phone when you get home. 📲
In this project, you will learn how to send a message to your parents' phone with a button. 👩👱
All you need is the box with a button and the USB dongle, so the basic HARDWARIO Start Set will do.
Get it started in Node-RED
-
Assemble the Start Set and pair it. The Core Module needs the twr-radio-push-button firmware. If you don't know how to download the firmware or what it is, you'll find out here.
-
In Playground, click the Functions tab, where you'll find the Node-RED programming workspace.
-
Place a light purple bubble, also called a node, on the Node-RED workspace. You'll find it on the left as mqtt in in the network section.
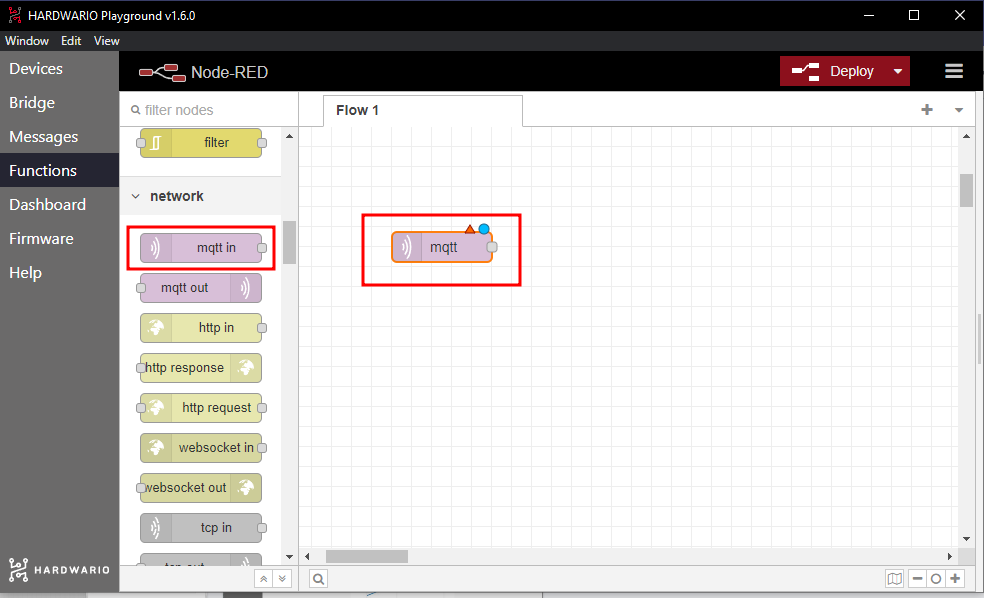
- In the node, you set up the key function: the button press. Double-click the node and copy this line into the Topic field:
node/push-button:0/push-button/-/event-count
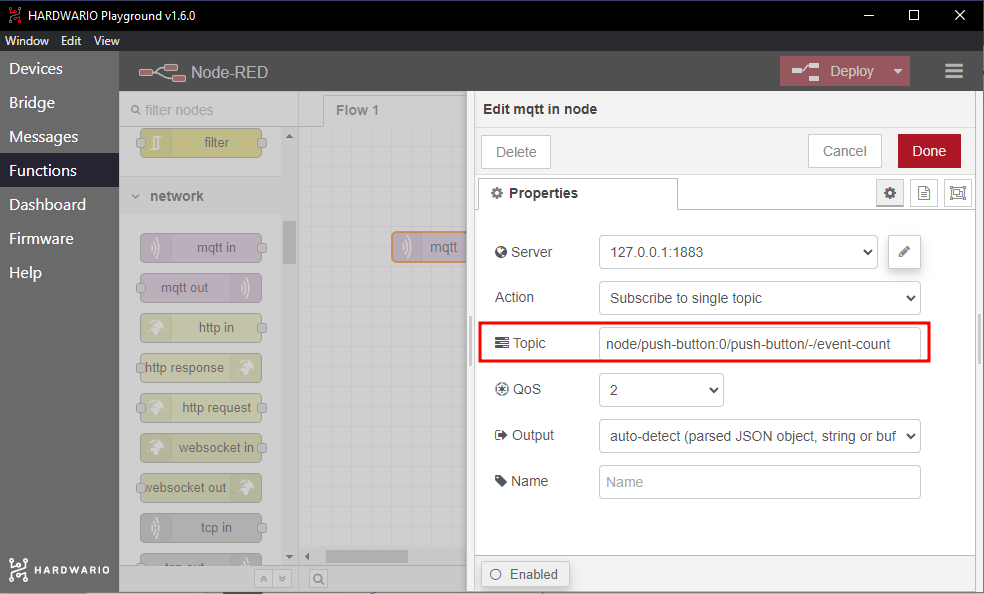
Confirm with Done.
Tip: Next time, instead of copying the line from here, you can simply copy the line that appears in the Messages tab after you press the button.
Set up your message
- You set up your message here in Node-RED too. Anywhere next to the light purple MQTT node, drag the yellow node called change from the function section.
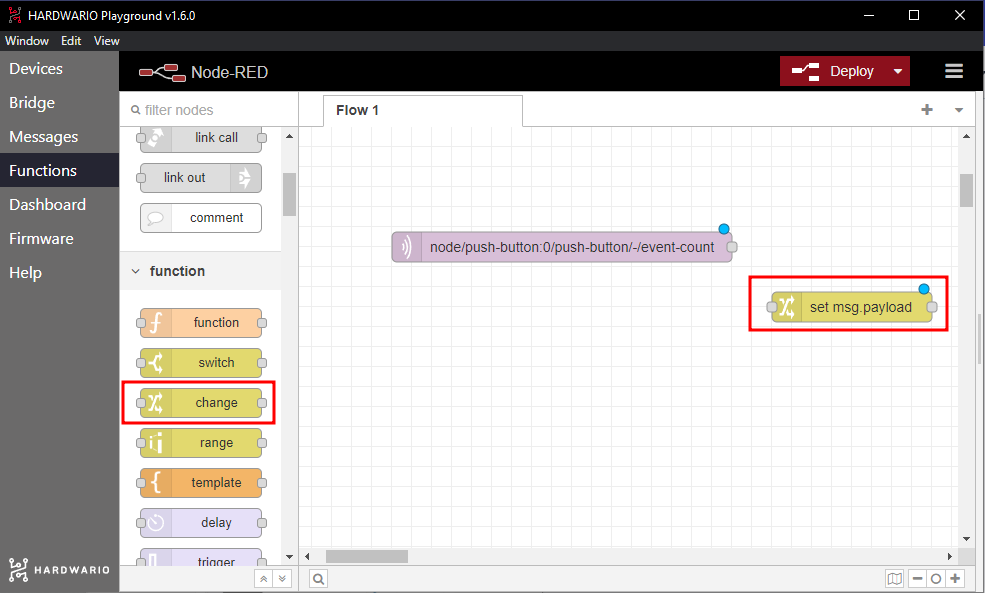
- Double-click the node and write your message for your parents in the Rules field. Just be careful: Blynk doesn't show accented letters such as č or á. A little inspiration:
- Relax. I'm home and safe.
- A celebrity has arrived… Just kidding. It's me.
- I was bitten by dogs and kidnapped by a UFO, but I made it home.
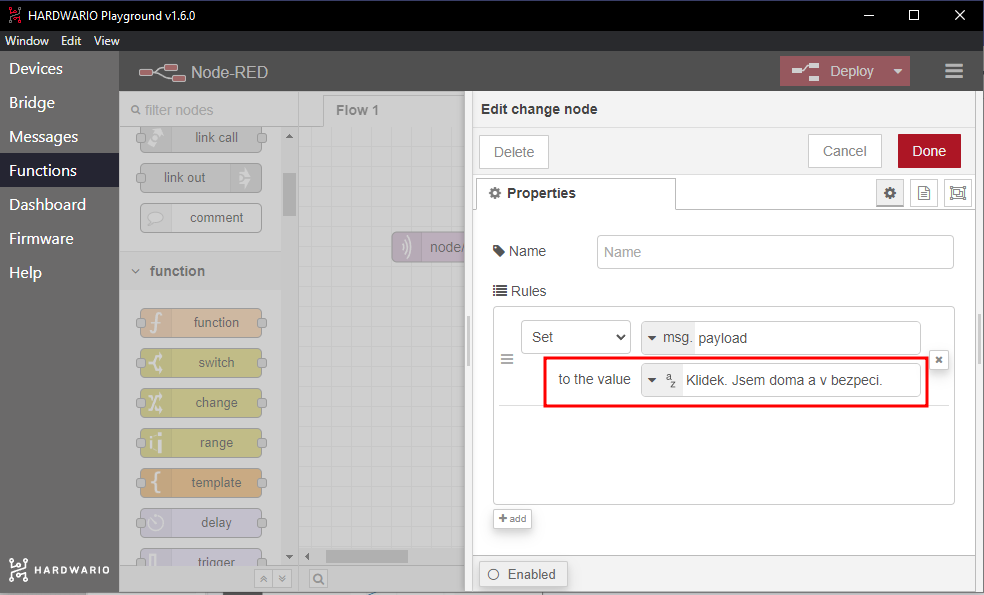
Confirm with Done and connect the two nodes by dragging the mouse from one bubble to the other. 🐁
Prepare the Blynk IoT app
The message reaches your parents' phone as a push notification from the Blynk IoT app. Node-RED sends the text of the message to Blynk, and a Blynk automation turns every new message into a notification.
-
If you don't have an account yet, create one in Blynk IoT. The free plan is enough for this project: at the time of writing, it includes push notifications in the app and up to five automations.
-
Next, create a device template. Blynk's quick guide shows you how. If you already have a template from an earlier project, feel free to use it.
-
Now set up a new datastream. In the template details, open the Datastreams tab, click New Datastream and choose Virtual Pin. The datastream settings open.
-
Name the new datastream (for example
Message) and pick one of the free pins, for example V2. The notification on the phone should show your own message, so choose String as the Data Type (a text string). -
In the datastream settings, also allow automations to use it as a condition: in the Automations section, turn on Use as Condition. Create the datastream by clicking Create.
-
Save the template with the Save button in the top right corner.
Create a device
If you don't have a device yet, create one from the template: in Devices, add a new device, choose your template and give the device a name. You'll find its Auth Token on the device's Device Info tab. You'll need it in Node-RED.
Create an automation
-
Switch to the Automations section and create a new automation.
-
Choose Device State as the condition. The automation then runs every time Node-RED sends Blynk a new message.
-
Setting up the automation is simple: under When, you set when it runs, and under Do this, what happens next.
-
Start with When: choose your device and the datastream you created. A third menu appears: leave it set to Is Any. The automation then reacts to every message, even when it's the same as the last one.
-
Under Do this, add the action that sends a notification to the mobile app (Send In-App Notifications) and choose yourself as the recipient. Put the Trigger value placeholder (
{TRIGGER_VALUE}) in the notification text. Blynk replaces it with the text of your message. -
Finally, don't forget to fill in the automation name. Limit period sets how soon the automation may run again. Choose the shortest option, otherwise a second message sent soon after the first won't arrive.
-
Save the automation with Save.
Set up the mobile app
-
Borrow your mum's or dad's phone and make it a little bit smarter. 🤓 To see your message, they need the Blynk IoT app on their phone. You can download it from the App Store or Google Play.
-
After installing it, sign in with your account. The free plan has only one user, so you sign in with your own account on your parents' phone too. Allow the app to show notifications, so the message can pop up.
Connect the phone to the box
-
Go back to your computer. On the Node-RED workspace, add the green write node after the two nodes. You'll find it on the left in the Blynk IoT section (careful, not Blynk ws: that belongs to the old Blynk, which no longer works).
-
Double-click the node to open it. Next to Connection you'll see a small pencil. Click it and a new window opens. In the Url field enter
blynk.cloud, and into the Auth Token and Template ID fields copy the values from the Blynk web app on your computer: the Auth Token is on the device's Device Info tab, the Template ID in the template details.
Confirm the settings with Add.
-
In the Virtual Pin field, enter the number of the datastream's pin (2 for V2) and save everything with Done.
-
Connect the write node to the yellow node where you set your message. You've now programmed the device so that pressing the button on the box ➡️ turns into a message ➡️ that travels all the way to your parents' phone. 👾
❗ Start the whole flow with the red Deploy button in the top right corner. 🚨
And… action!
-
Press the button. A message pops up on your parents' phone. 💪
-
Your parents will think you're a genius, and you'll be spared their daily phone calls. 🎉 And that's just so smart, it must be IoT. 🕺