Safe drawer
Introduction
Do you have a diary, poems or a top secret government-issued document in your drawer? If it's something nobody should see, secure it. 🔒 Turn your IoT Start Set into a drawer monitor and get alerts on your mobile phone. 📲
This project teaches you how to create a drawer monitor that sends alerts to your mobile phone when some opens your drawer. 👈
You only need a box with a button and a Radio Dongle. That's why the basic HARDWARIO Start Set is perfect.
Download the firmware
- Upload special firmware to the Core Module, specifically bcf-radio-x-axis-detector (you can find it among other firmware in the Playground). Thanks to this firmware, the box will be more sensitive to movement. 👌
Our tip: Don't know how to download firmware or what it is? Find out here
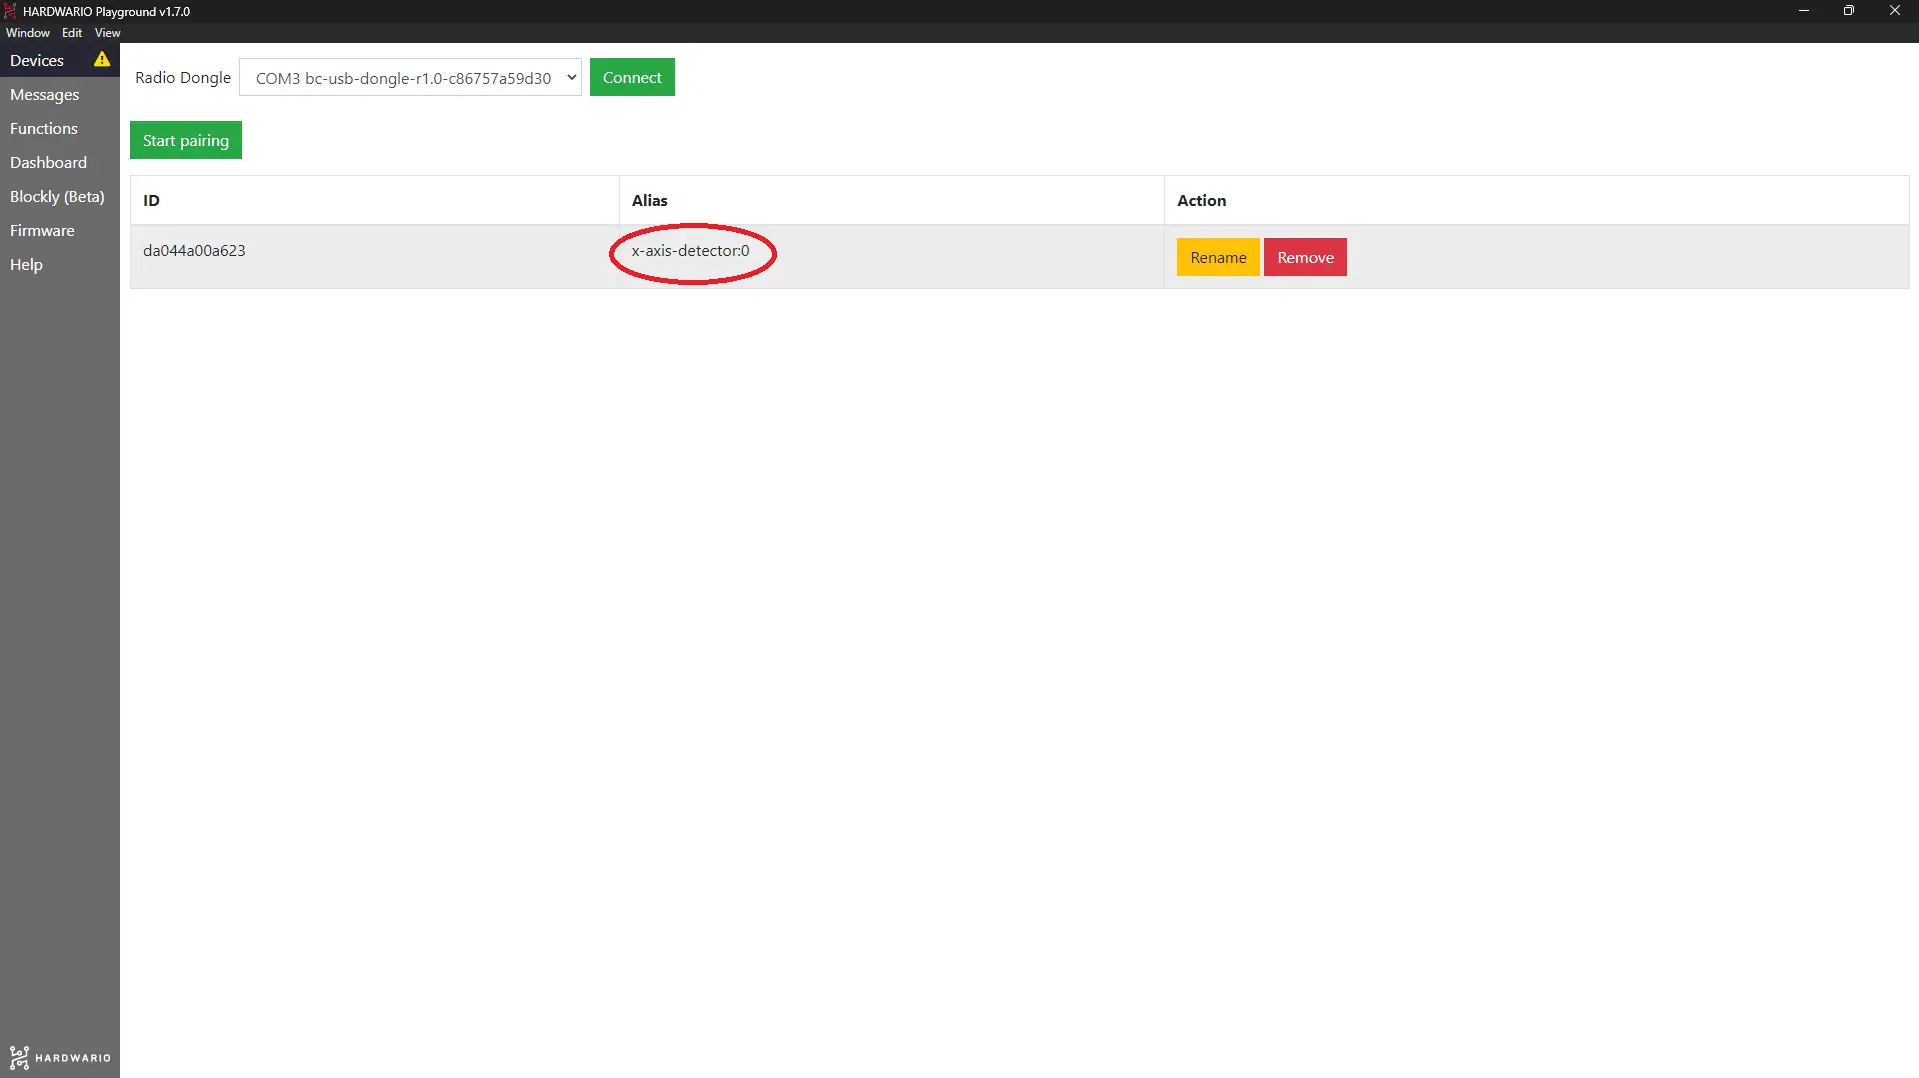
- Pair the Core Module with the USB Dongle. Right after pairing, you'll see that your Core Module has changed its Alias to x-axis-detector.
Prepare the Blynk IoT app
The box will report to your smartphone through the Blynk IoT app. 📱 You'll set up two things there: a switch to arm and disarm the detector, and a push notification that fires when someone opens the drawer.
-
If you don't have one yet, create an account in Blynk IoT. See this guide for how to set up your account, a device template, and a device — you'll need all three. You can also reuse a template from a previous project.
-
Add a Datastream for the detector state. On the template detail, open the Datastreams tab, click Edit in the top right, then + New Datastream and choose Virtual Pin. Pick a free Pin and choose the Integer type with a range of 0 - 1 (0 = off, 1 = on). Note the Pin number — you'll need it in Node-RED. Click Create, then Save the template.
-
Add a notification Event. On the template, open the Events tab and add a new event (for example, name it
drawerand give it the message you want to receive — be careful, Blynk doesn't handle accents and special characters 🤷). Turn on Notifications for that event so Blynk delivers the alert to your phone. The guide walks through the template settings. -
If you don't have a device yet, create a device from your template — described in the same guide.
-
Download the Blynk IoT app on your phone from the App Store or Google Play and sign in with the same account. Make sure notifications are allowed for the app so the alert can pop up. 📱
-
On your phone, open the device and set up its dashboard: add a Button widget, set it to Switch mode, and bind it to the detector-state Datastream you created. This is how you'll conveniently arm and disarm the detector from your phone.
Set up the message in Node-RED
-
In the Playground, click on the Functions tab, where the Node-RED programming canvas is located.
-
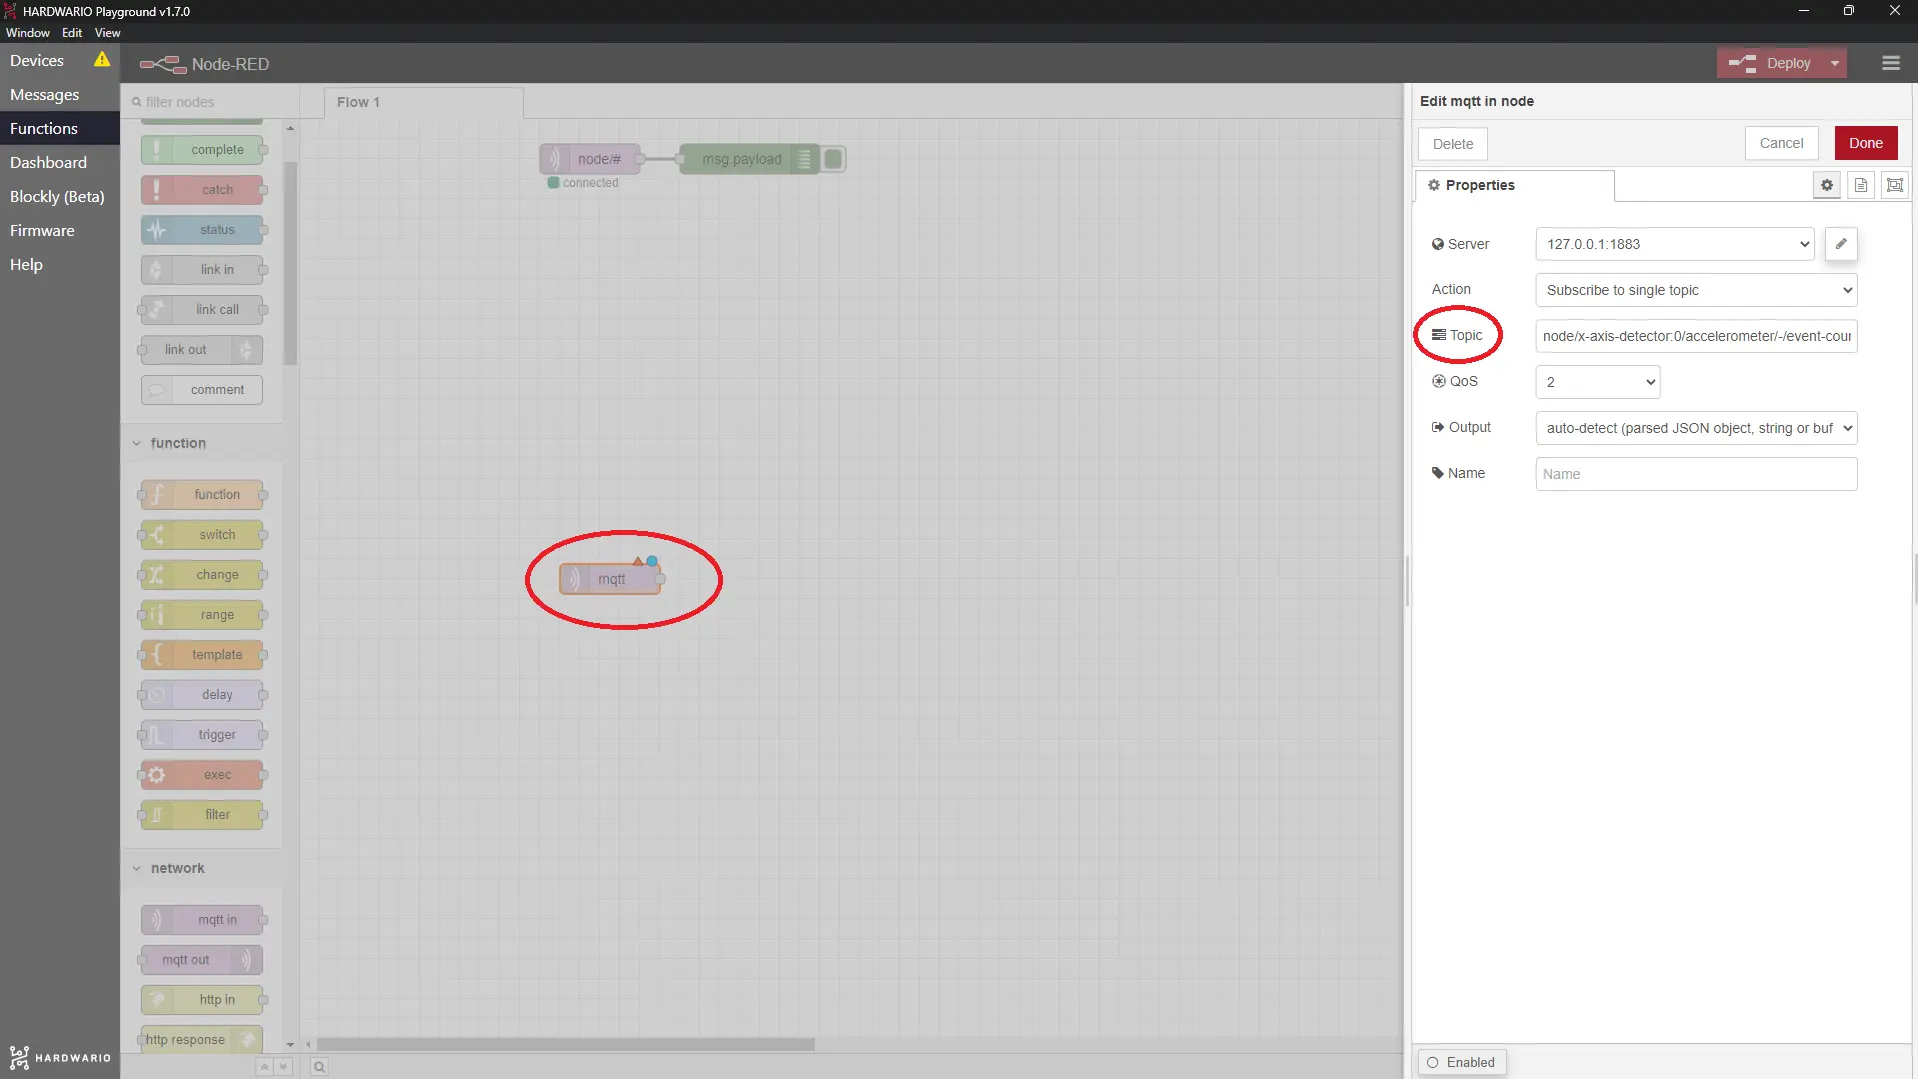
Start as always: first place an MQTT node from the Input section on the canvas.
Double-click on it and copy the Topic into the line, which the box uses to detect movement changes:
node/x-axis-detector:0/accelerometer/-/event-count
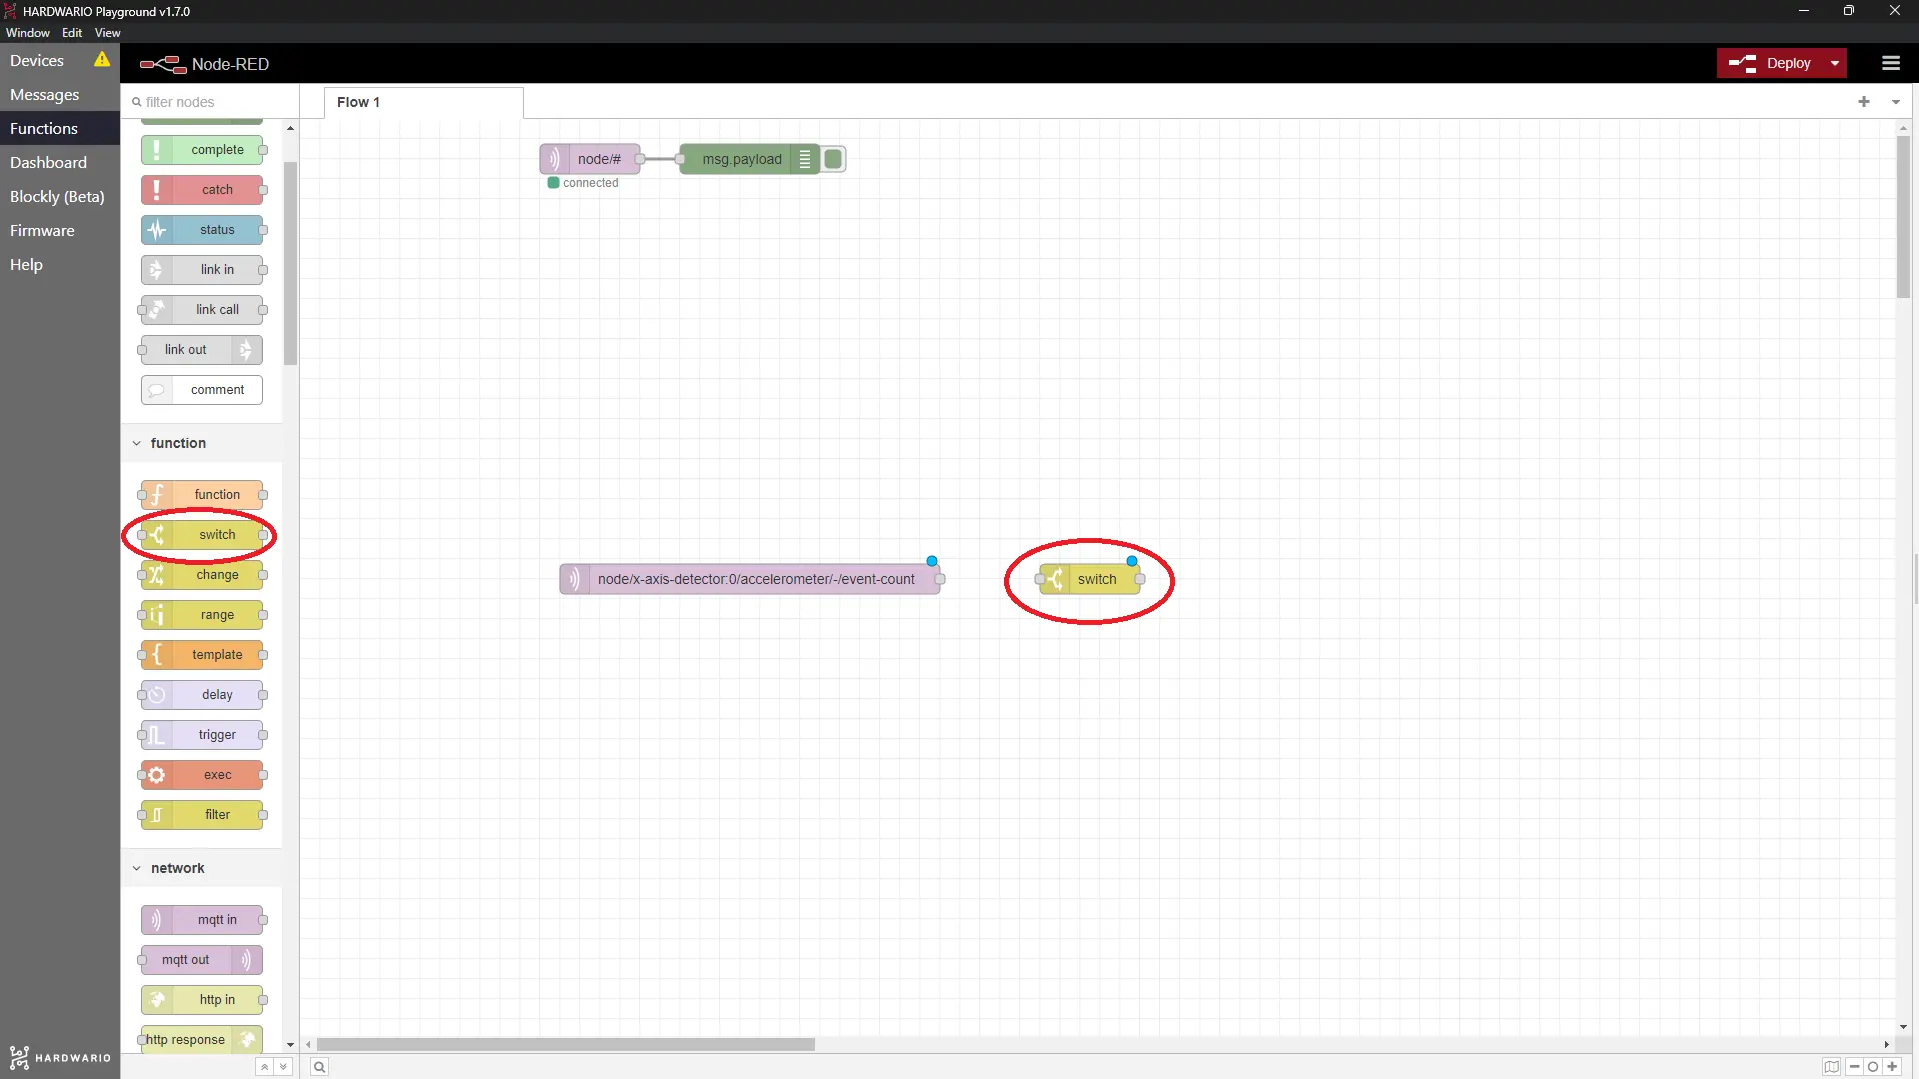
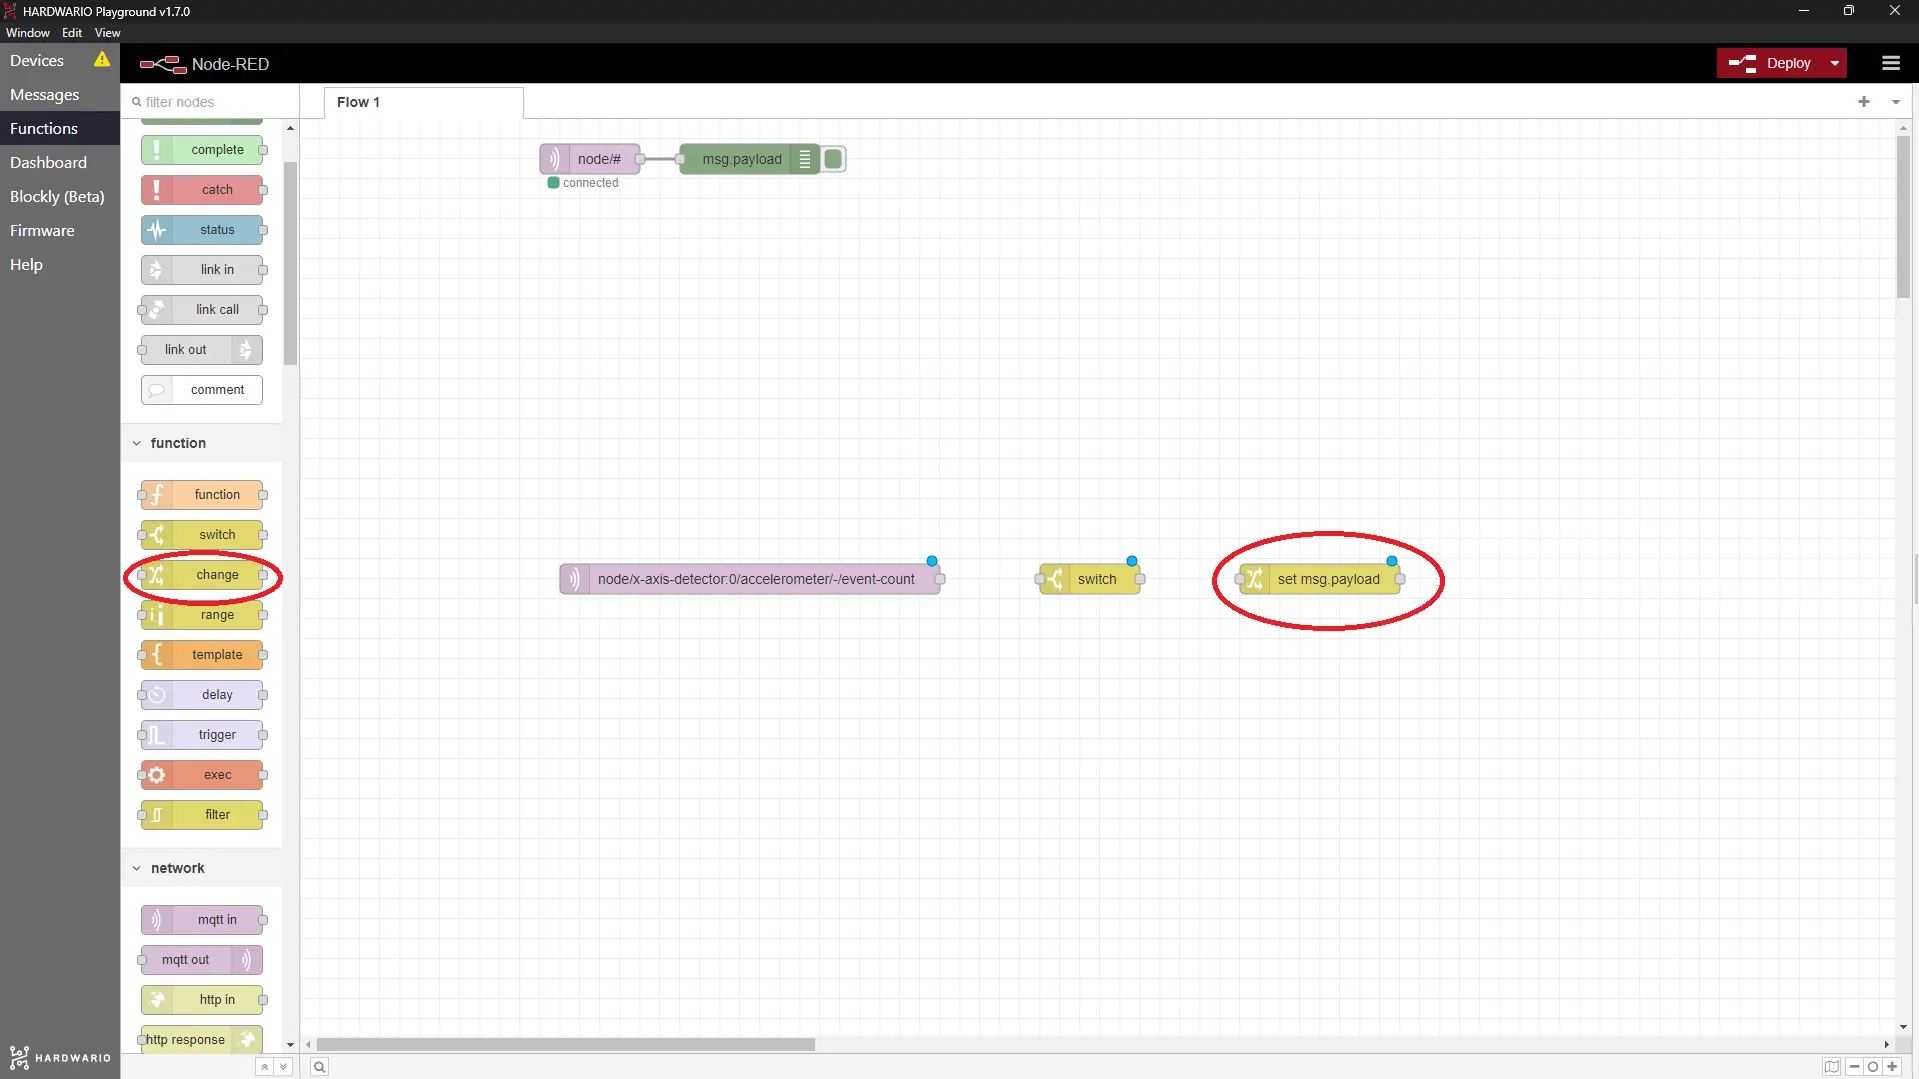
- Next to this node, place a Switch node from the Function section. Thanks to this node, you can turn off detection when you're home and opening the drawer yourself.
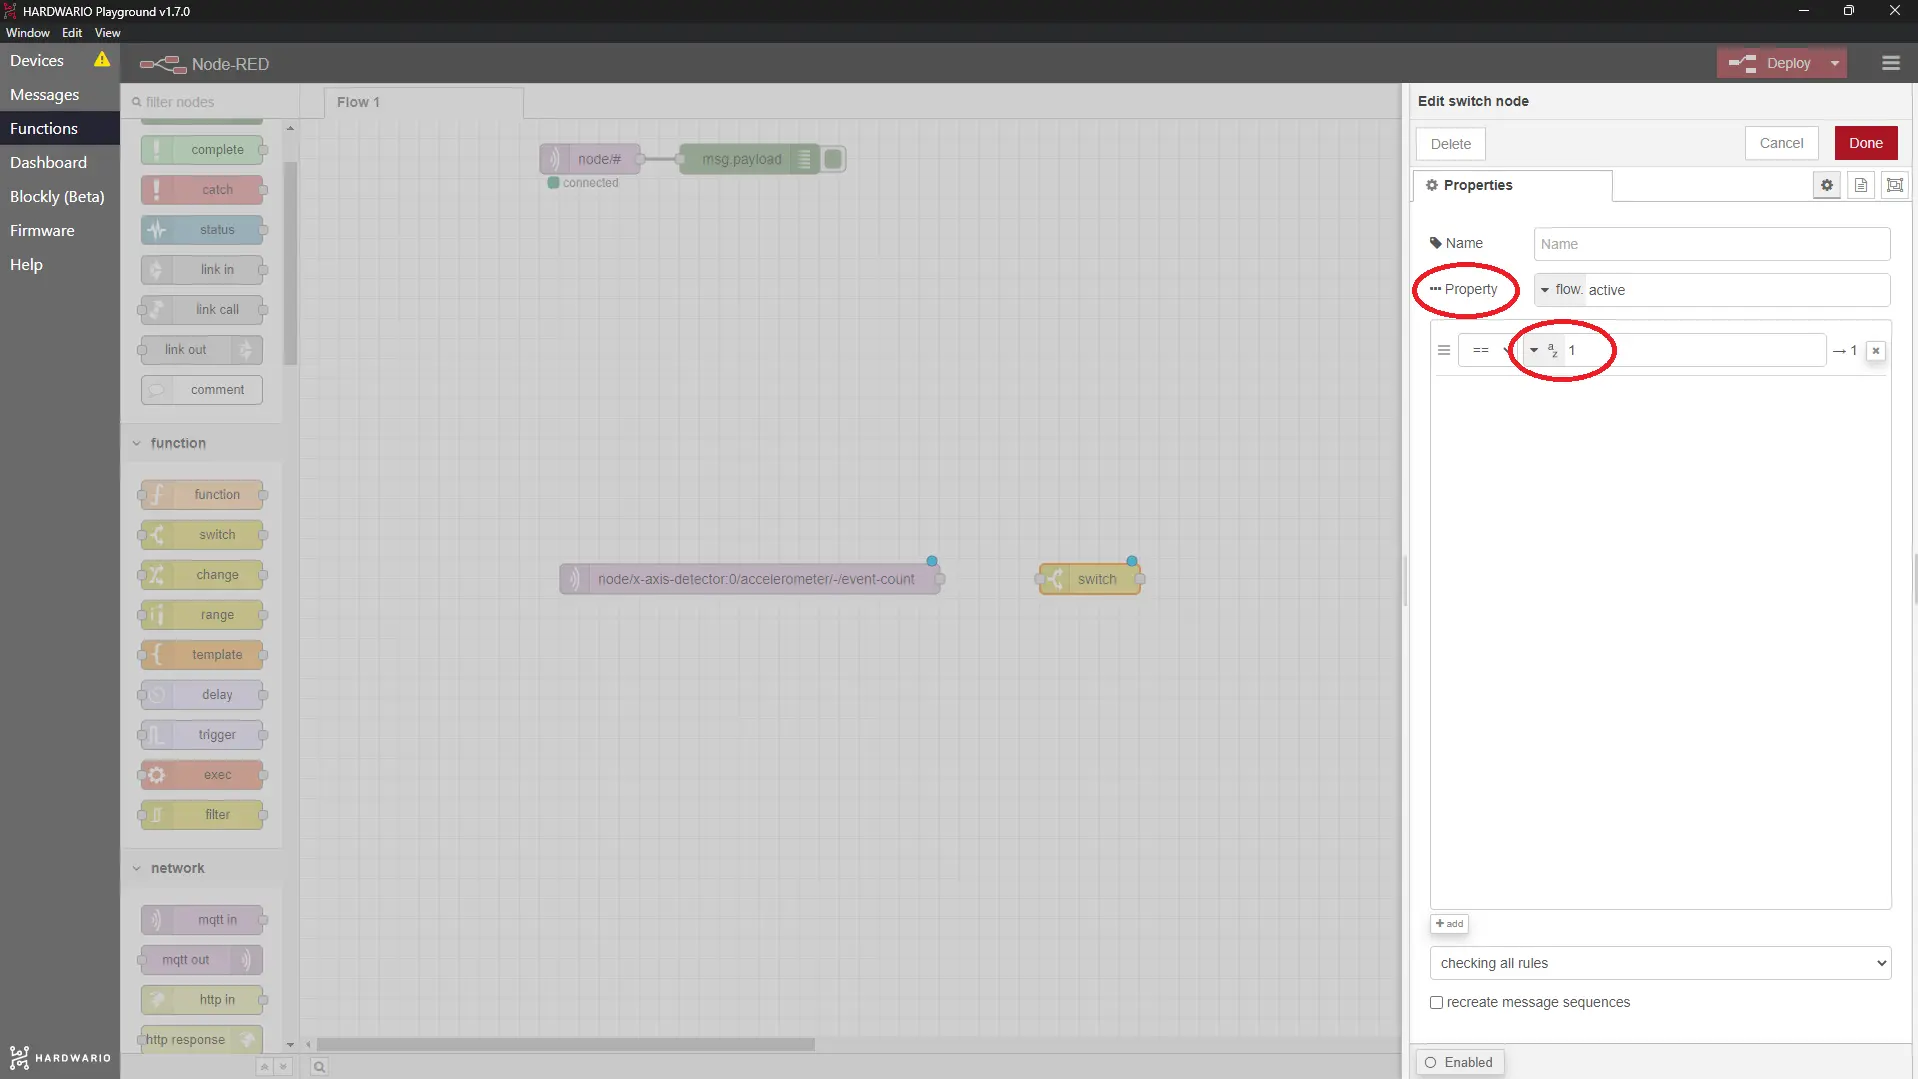
- Inside the node, change the Property line to flow.active. In the line below, enter the number 1. With this number one, the notification will be sent when the button is on, otherwise it will be discarded. Look at the picture.
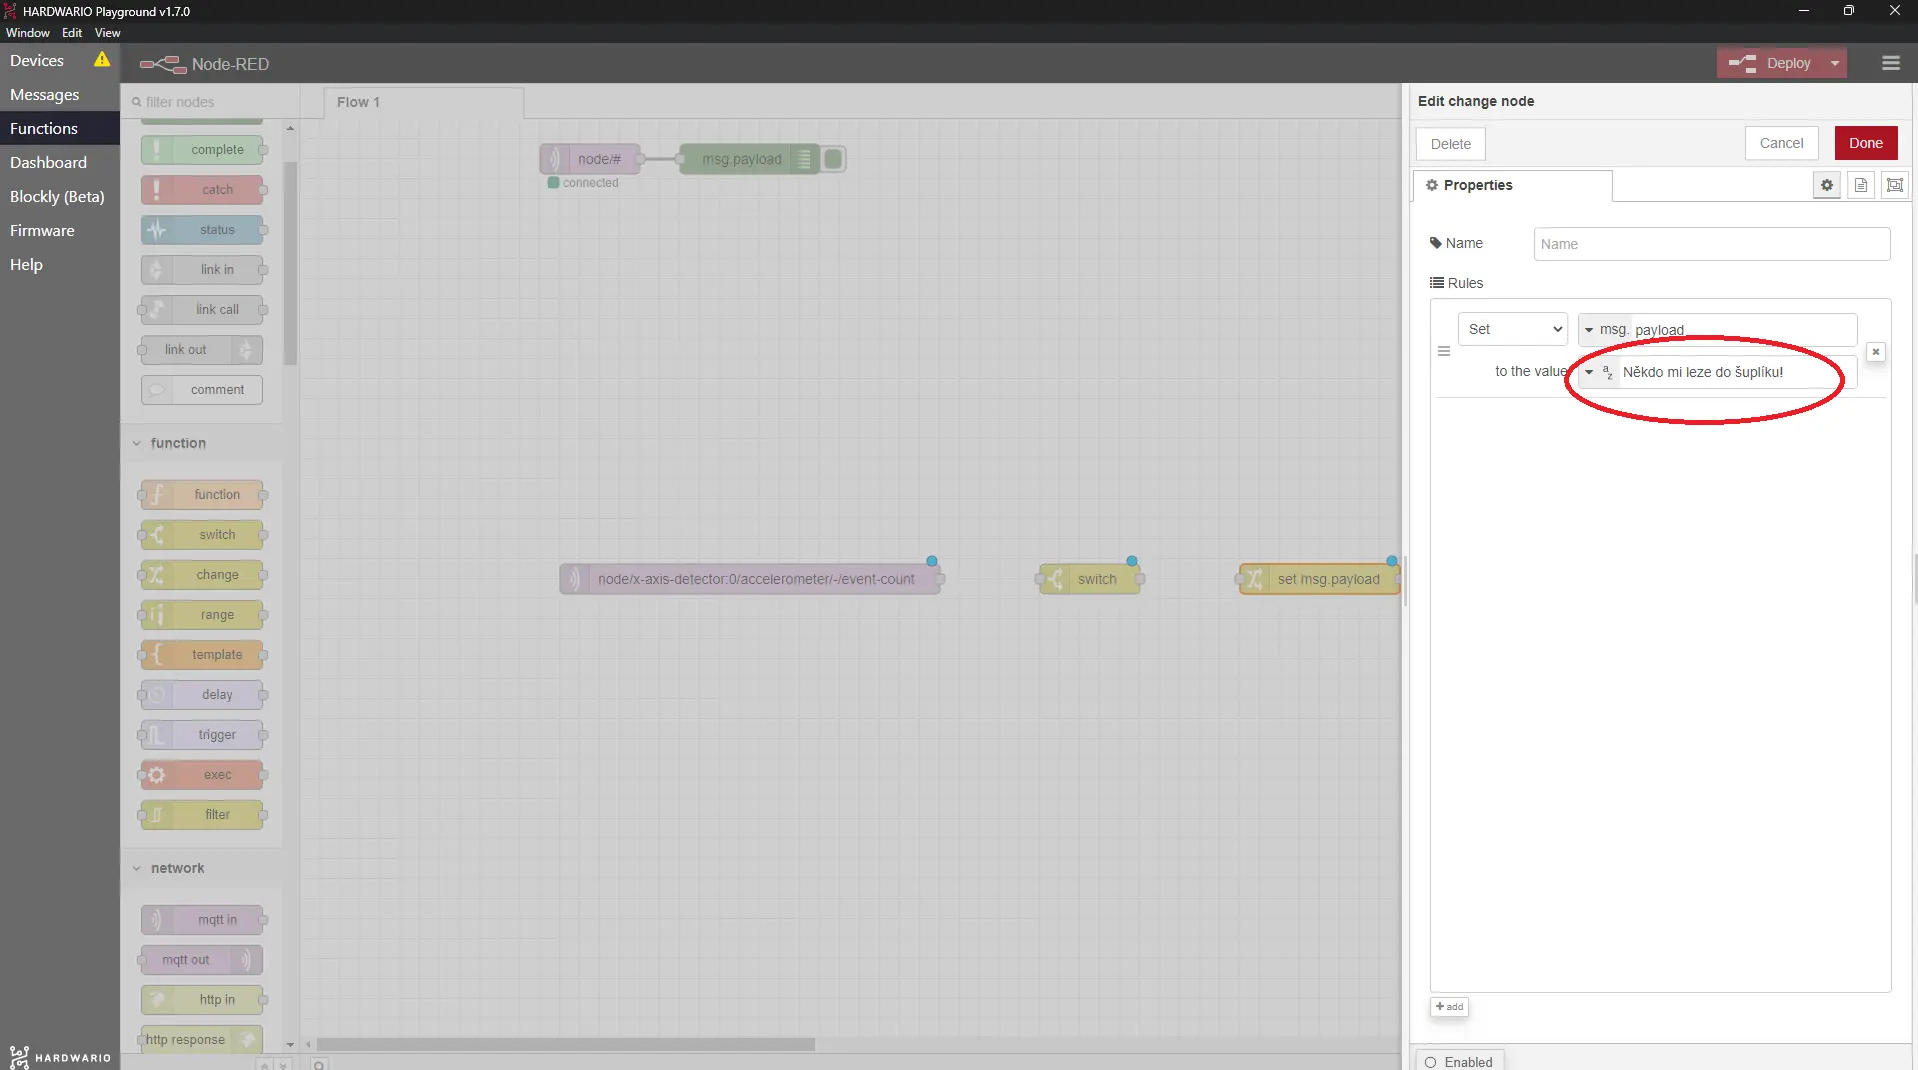
- After this, place another Change node from the Function section.
- In it, set up the message that will be sent to your mobile. Be careful, Blynk doesn't handle accents and special characters. 🤷
-
At the end of this food chain, place a node from the Blynk IoT section that can trigger your event (the log event node).
-
Double-click the node to open it. On the right you'll see a small pencil. Click it and a new window opens. In the Url field enter
blynk.cloud, and into the Auth Token and Template ID fields copy the values from the device detail in the Blynk IoT web app on your computer. Confirm with the Add button.
Our tip: Name the connection so you'll easily recognize it in other nodes later.
-
Set the node to fire the Event you created (the event code, e.g.
drawer). This is what turns the drawer opening into the push notification. Confirm with the Done button. -
Now connect this chain — MQTT ➡️ Switch ➡️ Change ➡️ Blynk IoT log event. And let's move on.
Set up the detector switch in Node-RED
This second chain reads the Switch widget from your phone, so you can arm and disarm the detector remotely.
-
Start another chain. Place a Write node from the Blynk IoT section on the canvas. This reads the switch state.
-
Double-click it to open the settings. In the Connection line, select the connection you set up in the log event node above. In the Virtual Pin line, enter the number of the detector-state Datastream you created in Blynk (without the letter "V"). Confirm with the Done button.
-
And the last node to the party. Place a Change node from the Function section on the canvas.
-
You'll set up the node to react to turning the switch off and on in Blynk. Double-click to open it and set the Rules fields to flow.active and msg.payload respectively, so the switch value is stored in
flow.active(which the Switch node in the first chain checks). -
Now connect these two beauties. Don't forget to also click the Deploy button at the top right so everything gets activated.
Start the trap
-
Place the box in the drawer lying flat.
-
Control everything else from your mobile phone. 📱 Open the device in the Blynk IoT app and arm the detector by flipping the Switch widget to the ON position.
-
And wait for the mouse to get caught. 🥁 As soon as someone opens the drawer, a push notification pops up on your mobile. Meanwhile, plan what you'll do with the sneaky troublemaker. We recommend making them do homework for you for a week. They deserve it.