Experiment
Time allocation: 10 min.
Monitoring Shocks with the IoT Button
Experiment Description
Using the HARDWARIO kit, we will build an IoT button. This device allows us to send information when a preset vibration limit is exceeded and then work further with that information.
Communication will take place wirelessly to the Radio Dongle plugged into the USB port of the computer. Vibration limit exceedance will be displayed in the HARDWARIO Playground application, specifically in the Node-RED dashboard.
Experiment Steps
- Assembling the button
- Connecting the button to the Playground
- Setting up a function to display a graph of the measured vibration level
- Configuring notifications for vibration threshold exceedance
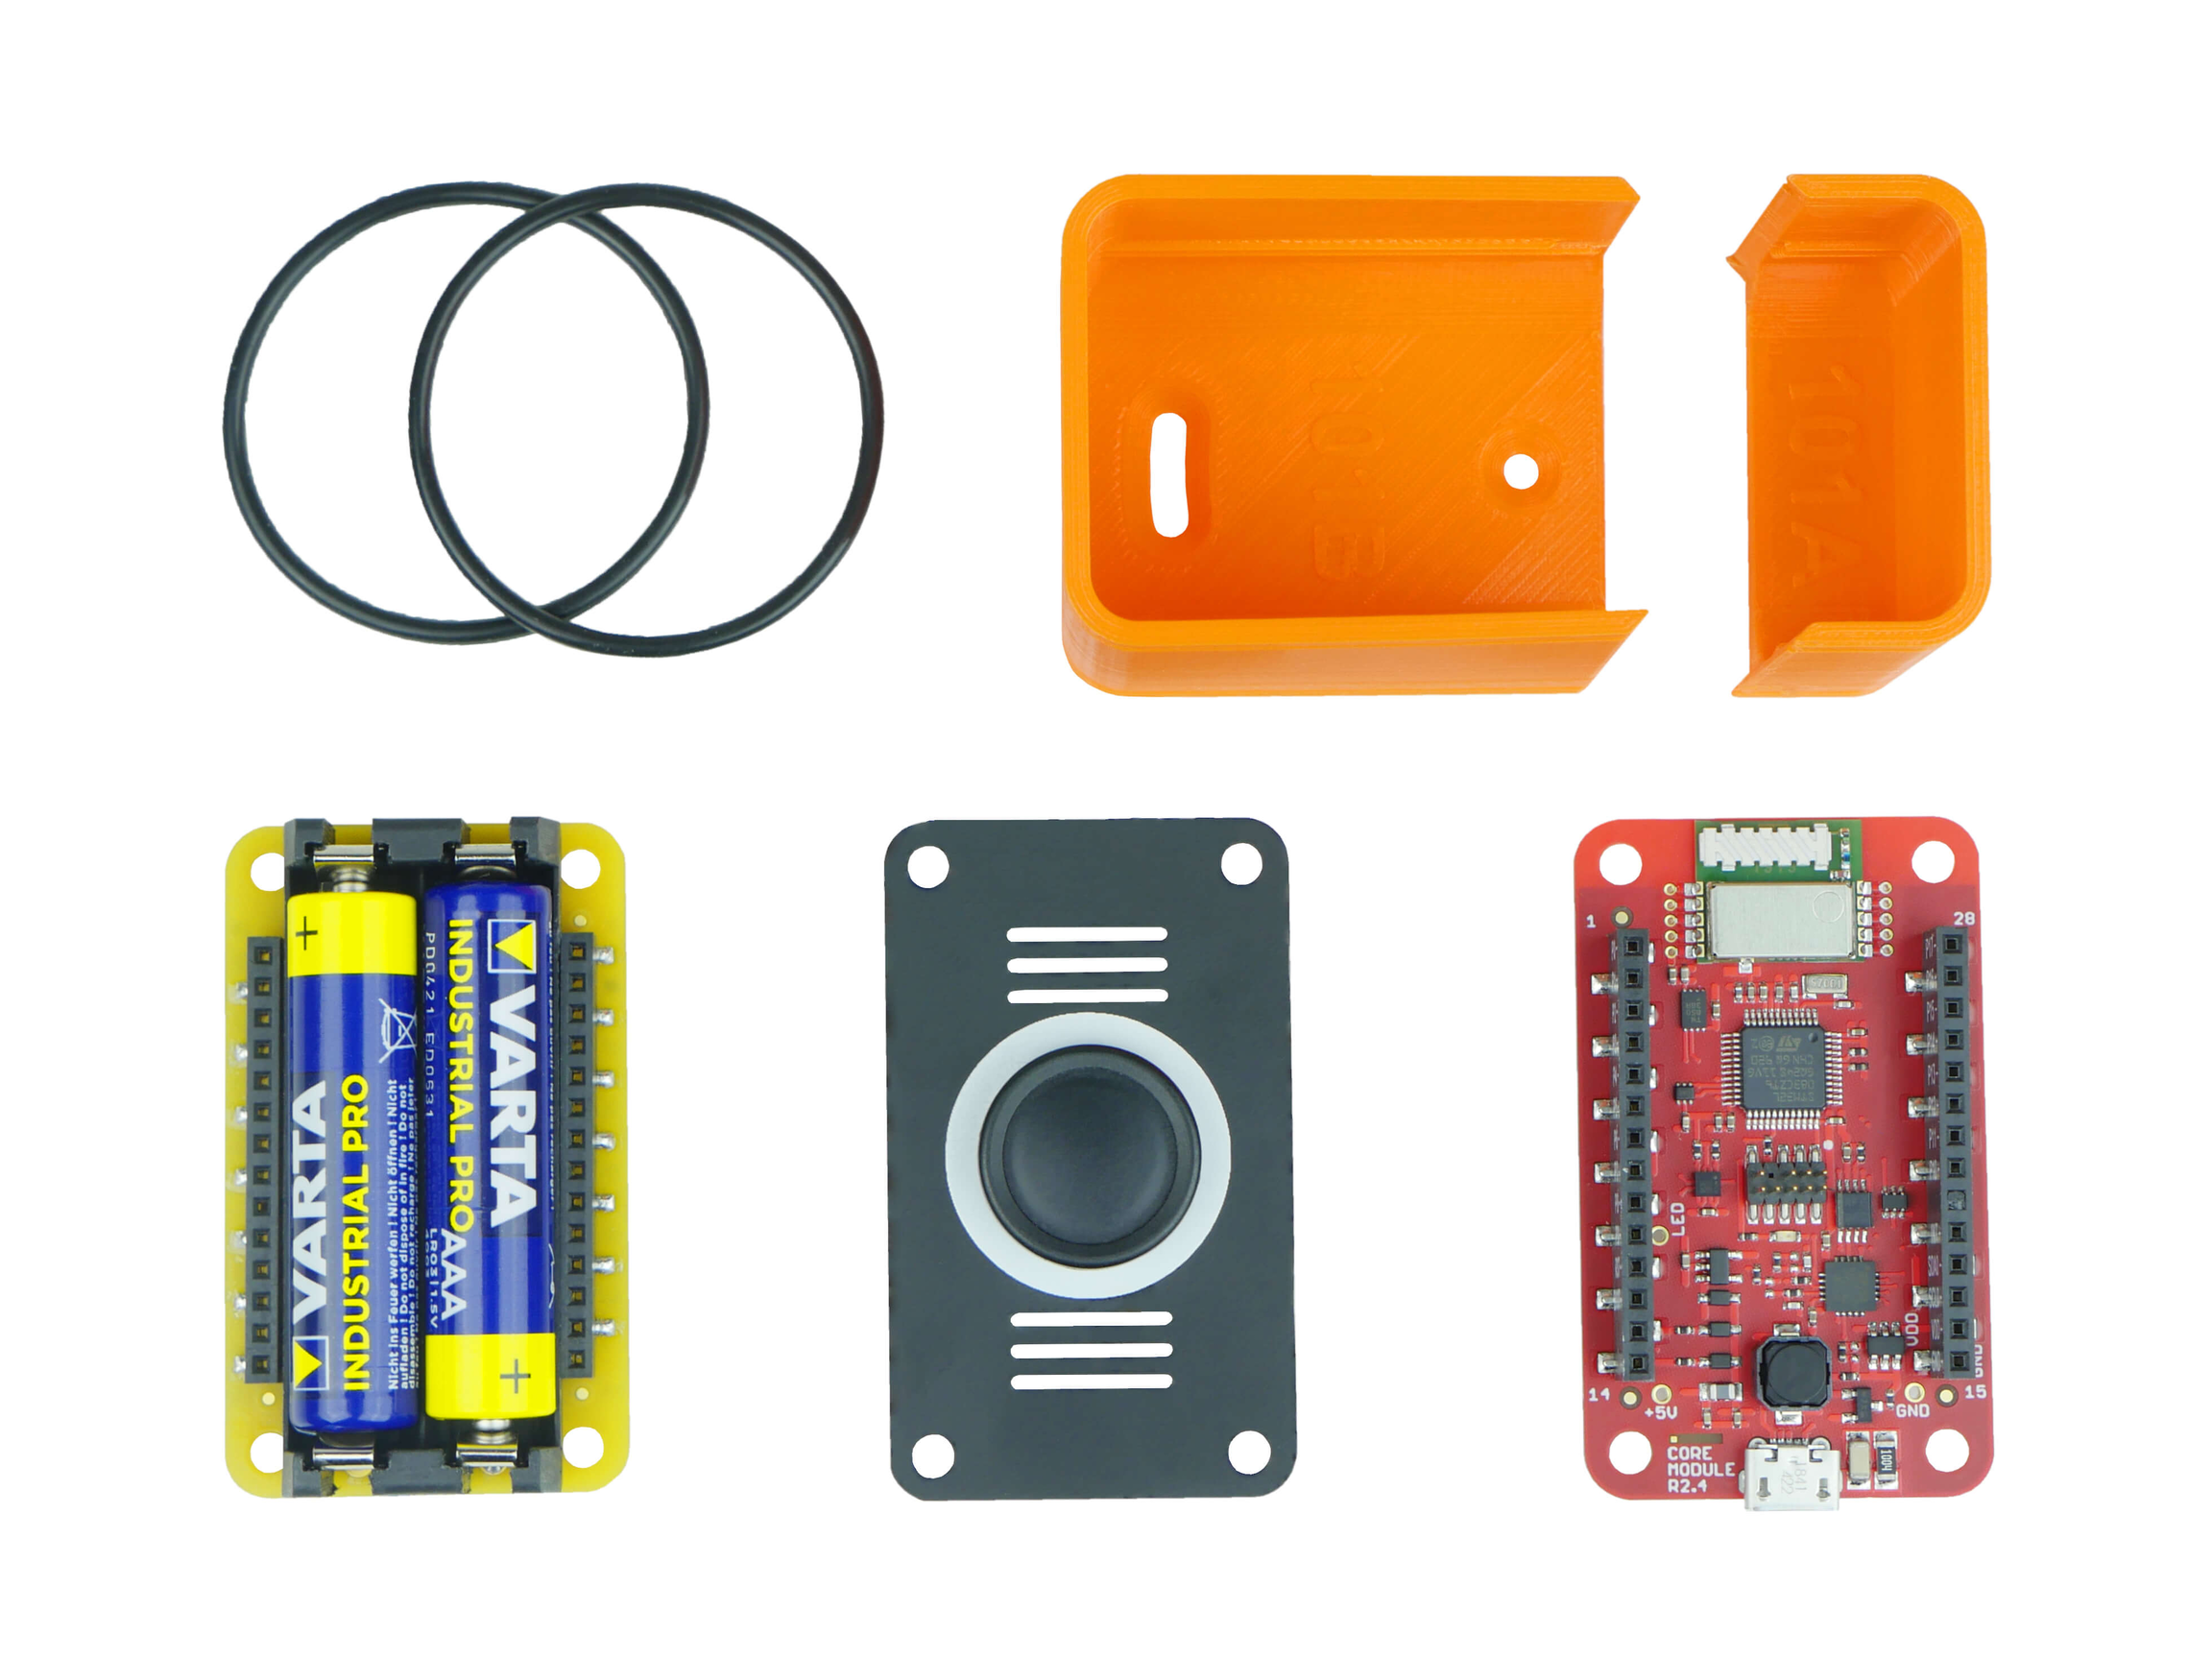
Assembling the Button
- Modules in the setup:
- Core Module
- Mini Battery Module
- Push Button Module
Build your unit according to the video tutorial
Uploading the Firmware
Connect the Core Module to your computer using a USB cable. In the Playground application (if you don’t have it on your computer yet, please download and install it), go to the Firmware tab, search for the firmware twr-radio-vibration-monitor, and upload it to the Core Module.
Check out the detailed guide on uploading firmware to the Core Module.
Connecting the Units to the Playground
- Plug the Radio Dongle into your computer’s USB port
- Open the Playground application and go to the Devices tab
- Select your Radio Dongle from the list of USB devices and click Connect
- Click Start pairing
- Insert batteries into the button
- Successful pairing will assign a device named vibration-monitor:0 under Devices
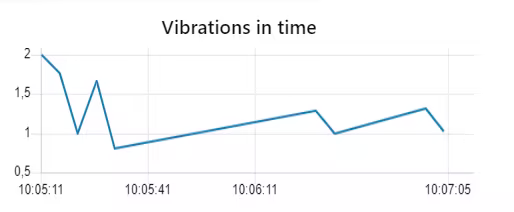
Setting Up the Function to Display Vibrations Over Time
- Switch to the Functions tab
- Import the following flow:
[{"id":"51d26186.e3f3b","type":"mqtt in","z":"d4f8ad49.c7f6a","name":"","topic":"node/vibration-monitor:0/magnitude","qos":"2","datatype":"auto","broker":"bb7a191.cab93e8","x":280,"y":420,"wires":[["c48fdc72.9e318"]]},{"id":"c48fdc72.9e318","type":"ui_chart","z":"d4f8ad49.c7f6a","name":"","group":"5ee4041d.fa300c","order":0,"width":"9","height":"4","label":"Vibrations in time","chartType":"line","legend":"false","xformat":"HH:mm:ss","interpolate":"linear","nodata":"","dot":false,"ymin":"","ymax":"","removeOlder":"10","removeOlderPoints":"100","removeOlderUnit":"60","cutout":0,"useOneColor":false,"colors":["#1f77b4","#aec7e8","#ff7f0e","#2ca02c","#98df8a","#d62728","#ff9896","#9467bd","#c5b0d5"],"useOldStyle":false,"x":660,"y":420,"wires":[[]]},{"id":"bb7a191.cab93e8","type":"mqtt-broker","z":"","broker":"127.0.0.1","port":"1883","clientid":"","usetls":false,"compatmode":true,"keepalive":"60","cleansession":true,"birthTopic":"","birthQos":"0","birthPayload":"","willTopic":"","willQos":"0","willPayload":""},{"id":"5ee4041d.fa300c","type":"ui_group","z":"","name":"Vibrations","tab":"11207769.c31889","disp":false,"width":"18","collapse":false},{"id":"11207769.c31889","type":"ui_tab","z":"","name":"Home","icon":"dashboard"}]

- Switch to the Messages tab – if everything went correctly, you should see incoming messages from the device (vibration-monitor)
- Switch to the Dashboard tab – if everything went correctly, you should see vibration levels over time
Setting Up a Notification for Threshold Exceedance
We will enhance the experiment by adding a notification when a configurable limit is exceeded. We will use notifications in the HARDWARIO Playground dashboard to achieve this, with the threshold and evaluation handled using a switch node.
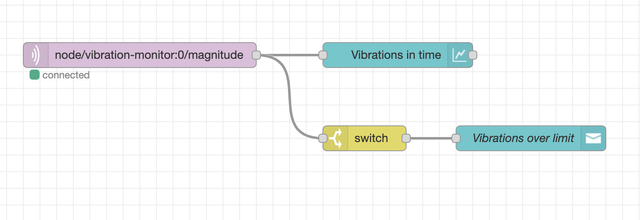
This is what the final flow looks like, with the vibration graph and a notification when the limit is exceeded
Procedure
- Add a switch node to the flow.
- Double-click to open the node settings. In the condition section, choose greater than or equal to (>=), set the variable type to number, and enter your limit value (e.g., 2).
- Add a notification node from the dashboard section and double-click to open its settings.
- In the Topic field, enter the message you want to display, e.g., Vibrations over limit:
- Connect all the nodes and click Deploy to start the flow.
- Experiment and try to exceed the vibration limit.
This is the final flow:
[{"id":"e835f2569a18b792","type":"tab","label":"Flow 1","disabled":false,"info":"","env":[]},{"id":"c668cf1ccdecb9c5","type":"mqtt in","z":"e835f2569a18b792","name":"","topic":"node/vibration-monitor:0/magnitude","qos":"2","datatype":"auto","broker":"54516ae2.8f3d14","nl":false,"rap":false,"inputs":0,"x":260,"y":160,"wires":[["2750b2a68969d71b","470f40e6383a2fab"]]},{"id":"2750b2a68969d71b","type":"ui_chart","z":"e835f2569a18b792","name":"","group":"12628c606492ac26","order":0,"width":"9","height":"4","label":"Vibrations in time","chartType":"line","legend":"false","xformat":"HH:mm:ss","interpolate":"linear","nodata":"","dot":false,"ymin":"","ymax":"","removeOlder":"10","removeOlderPoints":"100","removeOlderUnit":"60","cutout":0,"useOneColor":false,"colors":["#1f77b4","#aec7e8","#ff7f0e","#2ca02c","#98df8a","#d62728","#ff9896","#9467bd","#c5b0d5"],"outputs":1,"x":570,"y":160,"wires":[[]]},{"id":"54d1edb0c2a4230b","type":"ui_toast","z":"e835f2569a18b792","position":"top right","displayTime":"3","highlight":"","sendall":true,"outputs":0,"ok":"OK","cancel":"","raw":false,"className":"","topic":"Vibrations over limit:","name":"Vibrations over limit","x":730,"y":260,"wires":[]},{"id":"470f40e6383a2fab","type":"switch","z":"e835f2569a18b792","name":"","property":"payload","propertyType":"msg","rules":[{"t":"gte","v":"2","vt":"num"}],"checkall":"true","repair":false,"outputs":1,"x":530,"y":260,"wires":[["54d1edb0c2a4230b"]]},{"id":"54516ae2.8f3d14","type":"mqtt-broker","name":"","broker":"localhost","port":"1883","clientid":"","autoConnect":true,"usetls":false,"protocolVersion":"4","keepalive":"60","cleansession":true,"birthTopic":"","birthQos":"0","birthPayload":"","birthMsg":{},"closeTopic":"","closePayload":"","closeMsg":{},"willTopic":"","willQos":"0","willPayload":"","willMsg":{},"sessionExpiry":""},{"id":"12628c606492ac26","type":"ui_group","name":"Vibrations","tab":"11207769.c31889","order":2,"disp":false,"width":"18","collapse":false},{"id":"11207769.c31889","type":"ui_tab","name":"Home","icon":"dashboard"}]